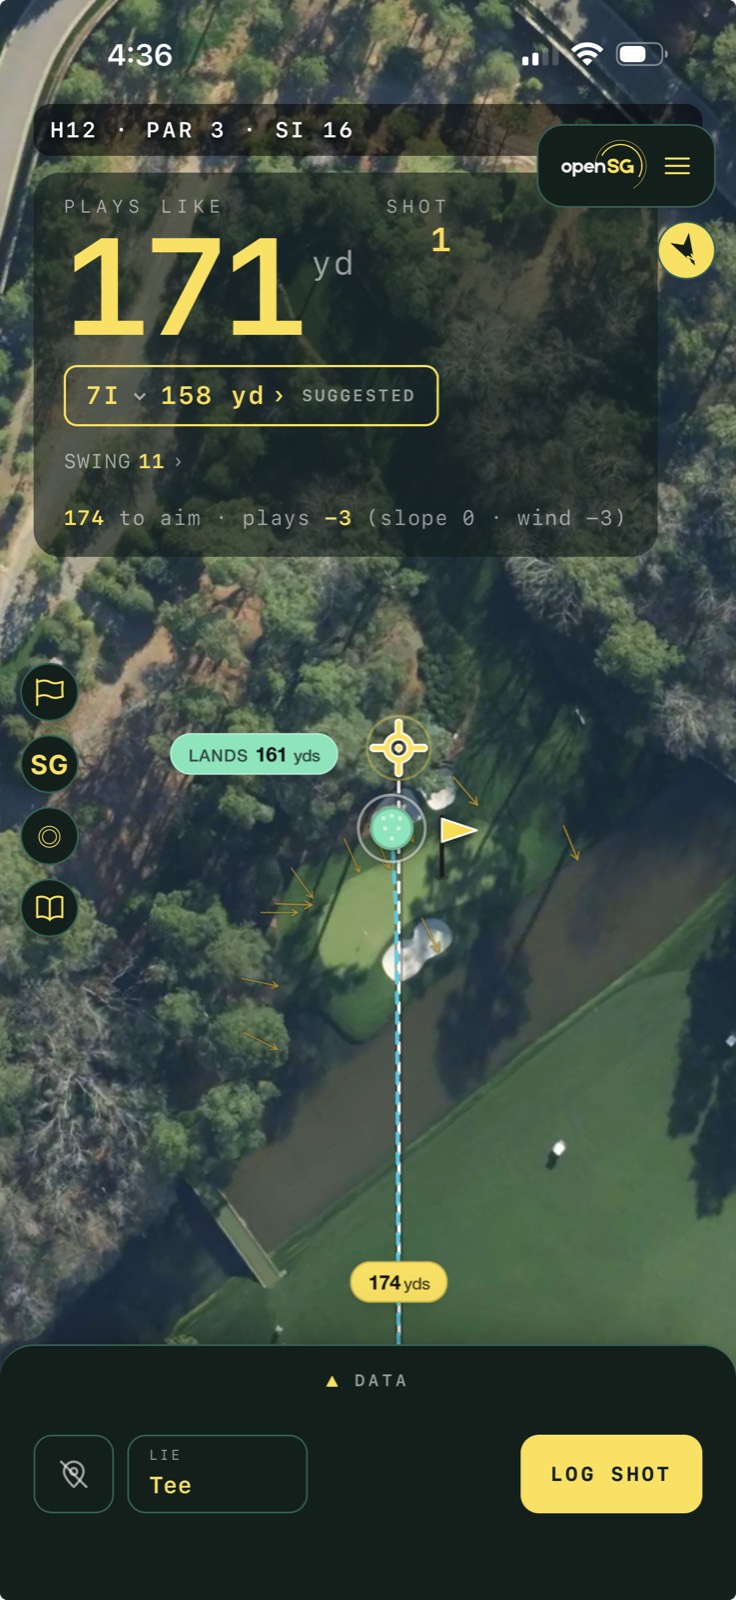
Watch any Masters and you'll hear the announcers say the same thing about the 12th at Augusta. Rae's Creek short, bunkers long, a shallow green tilted back toward the water. When that back-right Sunday pin comes out, nobody good fires at it. They aim at the fat center of the green, and they're perfectly happy walking off with a par from the back bunker.
That instinct is one of the most valuable things a good player knows. Aim at the fat part, take the bunker over the water. Most amateurs never internalize it. This post is about why it's right, how far you can get on feel alone, and how much further you can get when you can actually see the math.
You don't aim at a point. You aim a shotgun blast.
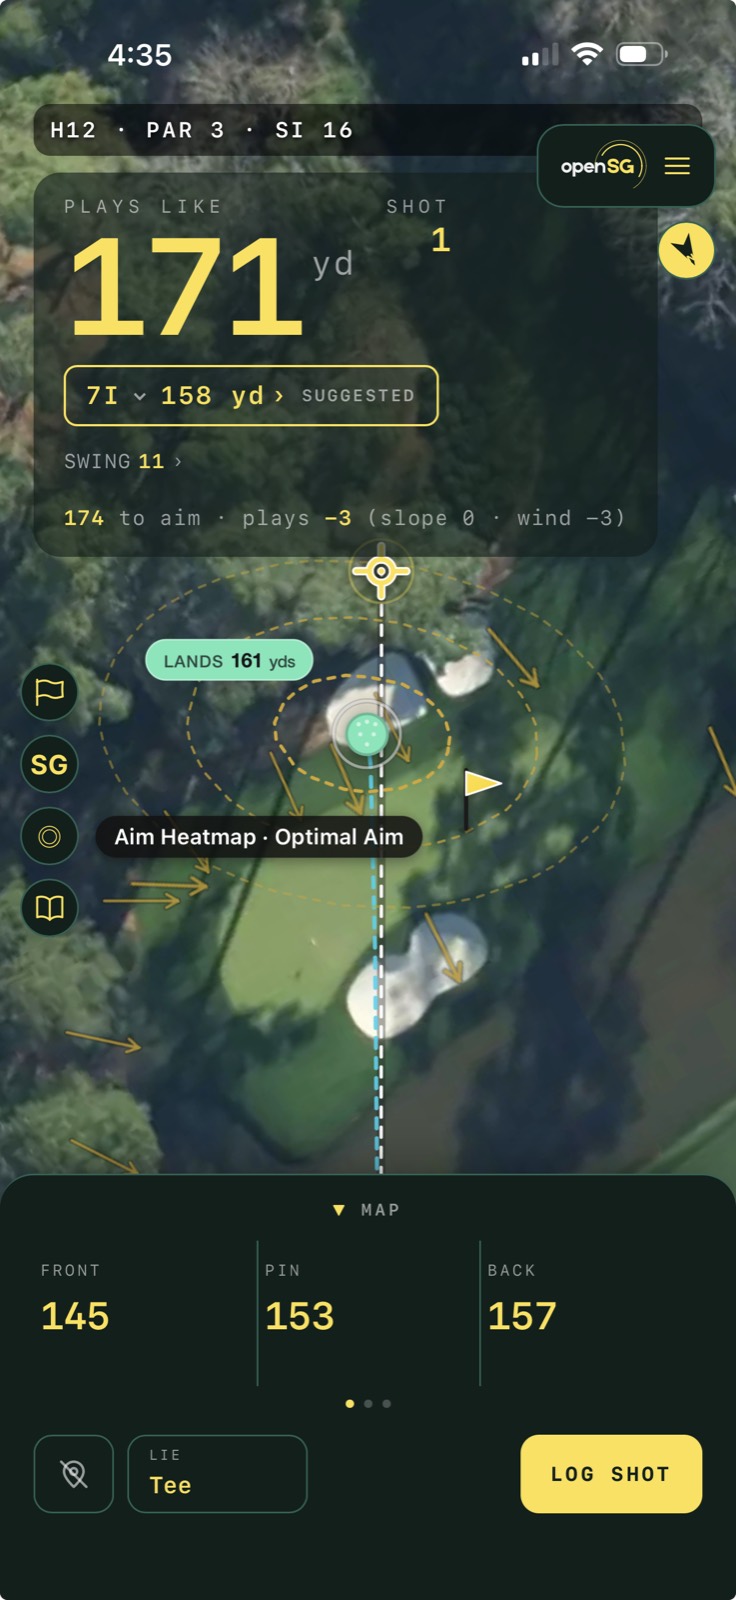
Here's the mental shift that changes everything. Your approach shot isn't a dot. It's a cloud. Hit fifty 8-irons at the same target and they'll scatter into an ellipse, usually longer than it is wide, and often tilted, because your misses have a pattern. That cloud gets bigger with the longer clubs. Bigger still from a bad lie.
So the real question over the ball isn't "where do I want this to finish." It's "where do I center my whole cloud so that all of it, the good ones and the normal misses, scores as well as possible." Once you think in clouds instead of points, three of the usual aiming strategies start to look shaky.
New to all this? Learn how OpenSG works — how we turn every shot you hit into a strokes-gained read on your game.
Three ways golfers aim, and where each one leaks
Aiming at the pin. This is what most amateurs do, and it optimizes for the wrong thing: the best-case outcome. You picture the one perfect shot that finishes tight. But you center your entire cloud on the flag, and when the flag is tucked near trouble, a big chunk of your normal misses are now in the bunker, over the green, or short-sided with no shot. You're chasing a kick-in birdie at the cost of a lot of doubles.
Aiming at the center of the green. A big improvement, and honestly good enough most of the time. Center of green is the "just make par" default, and it wins because it keeps the widest margin from every edge. But it's a blunt instrument. It treats all edges as equal. If there's water down the right and nothing but a friendly collar left, dead center is still leaking shots to the right that you didn't have to.
Aiming away from trouble. Now you're getting warmer, because you're finally weighting the misses. But "away from trouble" is vague. Away by how much? Trouble on both sides, so which one do you favor? Bias too hard away from the water and you've walked yourself into the bunker you were never afraid of, or short-sided on the safe side. "Away from trouble" has the right idea and no dial.
The strokes-gained optimal aim is what all three of those are groping toward. It's the single point where, if you center your cloud there, your average score over hundreds of shots is the lowest. Not your best score. Your average. It's almost never the pin. It's usually near but not exactly center, and it shifts, sometimes dramatically, the moment a real hazard enters the picture.
Not all misses cost the same, so favor the cheap one
This is the part that takes people the longest to accept. Back to the 12th: water short, bunker long. Instinct says split the difference and aim dead center to avoid both. But those two misses are nowhere near equal.
A greenside bunker costs you about half a stroke versus being on the green. Good players get up and down from sand all the time. Water is a penalty stroke, plus you're essentially re-hitting the shot from a similar distance, so it's closer to a stroke and a half. Out of bounds is worse still.
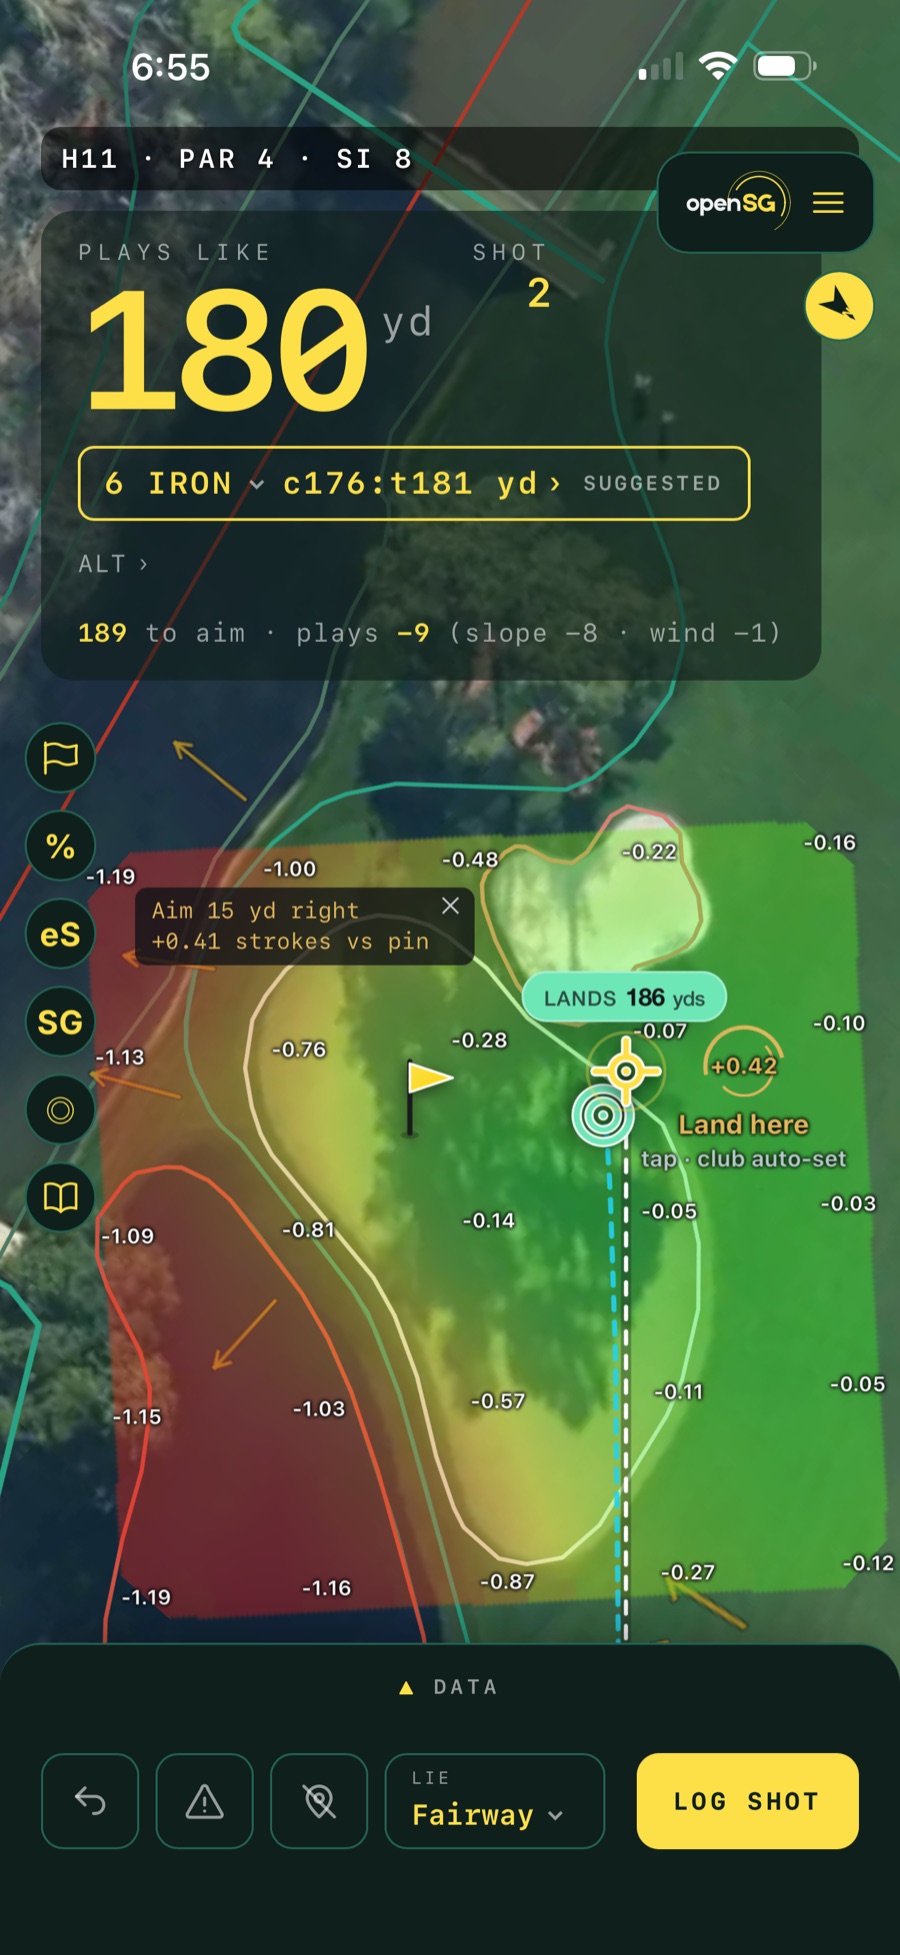
If your misses are symmetric but your penalties aren't, then aiming dead center leaks equal probability into a cheap hazard and an expensive one. That's a bad trade. The math says shift your aim toward the bunker. You come off the water enough to matter, and the extra shots that now find the sand barely cost you anything. That's exactly why the tour play on 12 is to aim past the flag toward the back bunker. You should be far less scared of a bunker than you are.
The general rule: bias your aim toward the cheapest miss, by an amount proportional to how much more the expensive miss costs. Bunker vs. rough? Barely shift. Bunker vs. water? Shift hard.
Want this working for your own game? Register now and OpenSG will bias the aim toward the cheap miss on every shot of your next round.
The green itself moves the ball
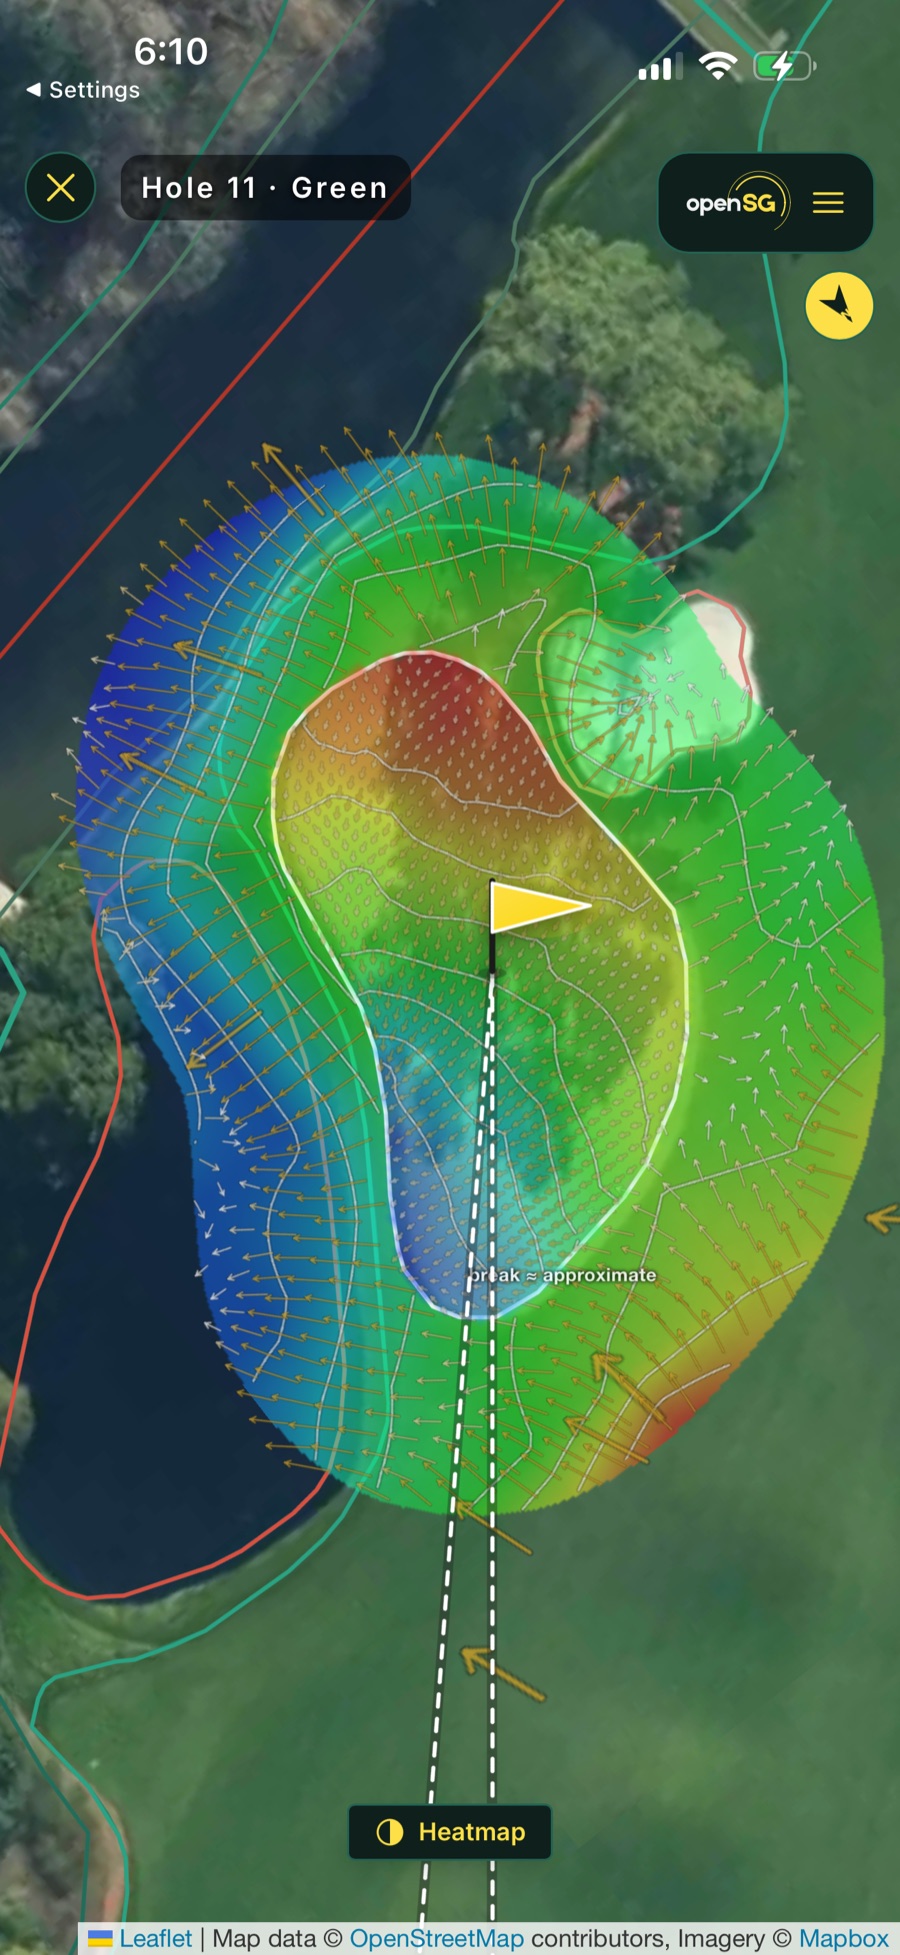
There's a second factor that pure "aim away from trouble" thinking completely ignores. Landing on the green isn't the same as staying on it. The 12th's green slopes back to front toward the creek, so a shot that lands on the putting surface can trickle right back into the water. Every green does a version of this. False fronts that reject a good shot, runoffs that feed a collection area, a back edge that won't hold anything long.
So picking a landing spot means thinking about where the ball goes after it lands, not just where it touches down. A landing zone that looks safe on the scorecard can be the most dangerous spot on the hole if the slope funnels it somewhere ugly. This is genuinely hard to eyeball, and it's where intuition most often fails even good players.
How OpenSG computes the optimal aim
This is where a tool earns its keep, because the honest truth is you cannot do this calculation in your head over the ball. Here's what OpenSG is actually doing when it colors the green and drops the "Land here" marker.
For every candidate aim point, it simulates a fixed set of 240 shots drawn from your dispersion. That dispersion isn't a guess. It's a bivariate-normal ellipse fit from your own tracked shots for that club (with under-sampled clubs borrowing shape from the rest of your bag, and a handicap-based fallback if you're brand new). The ellipse is asymmetric and tilted to match your real miss pattern, it scales with the club and distance, and a fraction of those 240 shots are modeled as genuine mishits (shorter, wider) at a rate tied to your handicap.
Two things then inflate the cloud realistically before a single shot is scored. Your current lie (hitting from rough or sand widens the pattern and raises the mishit rate), and the club and distance for the shot at hand.
For each of those 240 simulated landings, it does something most people skip entirely. It rolls the ball out. First the club's own run (a hot fairway wood keeps going, a wedge stops), then up to a few downhill hops down the greenside slope, read from the same elevation grid the plays-like distance uses. Only then does it classify where the ball came to rest: green, fairway, rough, bunker, trees, water, or out of bounds. A shot that lands on the green but slides off the false front into the creek gets scored as water, not green. Because that's what actually happened.
Each resting spot is converted to expected strokes from that lie and distance. Bunker carries its real sand penalty, water and OOB add the penalty stroke and replay from a drop, trees get a punch-out surcharge. Average those 240 outcomes and you have the score for that one aim point. Do it across a grid over the green and you have the heatmap. The "Land here" marker is the argmin, the single (club, target) combination with the lowest expected strokes. The number on it ("+0.3") is how many strokes you save versus firing at the flag. When the green simply can't be reached, it tells you that instead of drawing a fantasy.
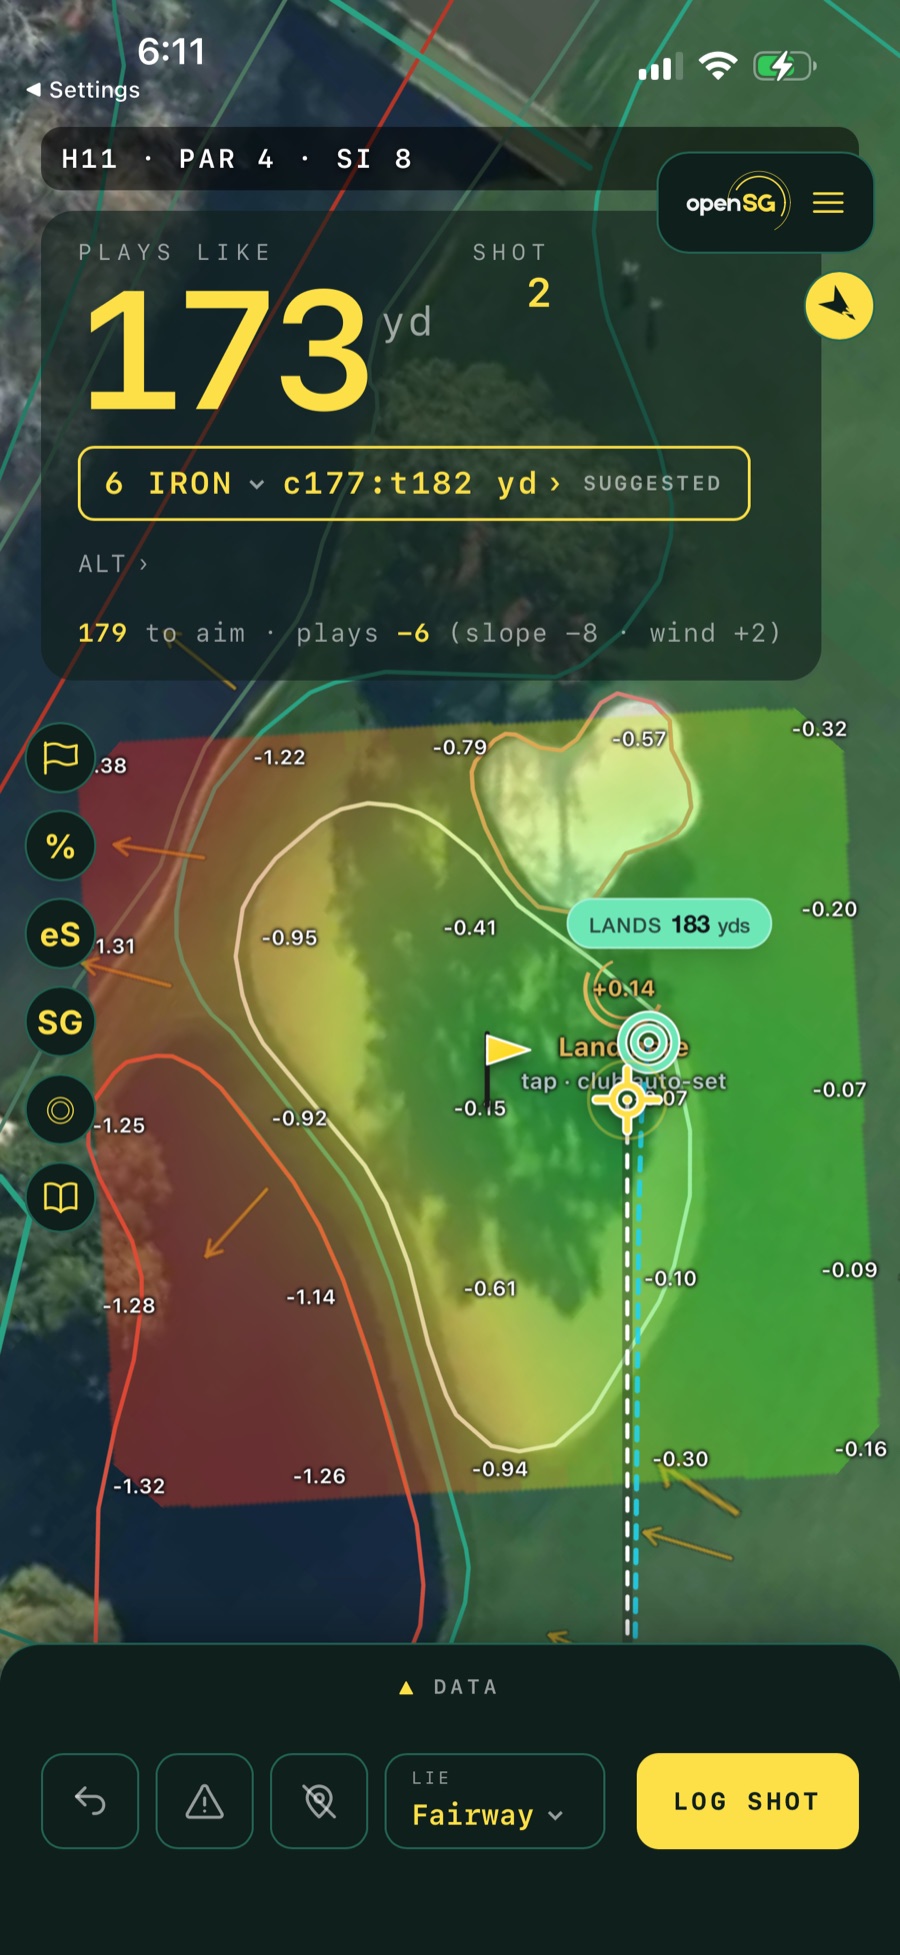
Worth being clear about where the work happens. Wind and elevation are handled in the distance-and-club layer — that's the "plays like" number, which already folds in slope, wind, and air density and hands you the club that carries there. What the aim math on top of it does not do is shift the optimal target sideways for a strong crosswind, curve the ball, or reshape your dispersion for wind; it also doesn't model spin or trajectory shape, and it can't know today's exact green firmness. So the depth is covered for you (use the club it gives you rather than clubbing up or down again), while a big crosswind and firm greens stay your call. It's a very good decision aid, not a ball-flight oracle.
Could you do this by hand?
Partly, and that's the interesting answer. If you mentally drew your dispersion ellipse and slid it away from the water and OOB until only a sliver overlapped them, you'd capture the single biggest win, because avoiding the expensive misses is 80% of the value. A good player does exactly this on feel.
But "just move the ellipse off the water" quietly skips three things the tool doesn't:
- Weighting misses by their real cost, not just avoiding them. By hand you tend to treat "trouble" as one category. The optimal point comes from bunker-costs-0.5 and water-costs-1.5 being different numbers that shift the aim by a specific amount.
- Inflating the cloud for your lie and club. Your ellipse from a fairway 9-iron and from a flyer lie in the rough with a 5-iron are wildly different sizes, and the right aim moves with them. You can feel this, but not precisely.
- The bounce and roll off the slope. This is the one that's genuinely impractical by hand. Knowing that a shot landing on the front third will release eight yards and off the back, or that the whole green sheds toward the water, is not something you can compute standing over the ball. And it's exactly the factor that turns a "safe" aim into a wet one.
So eyeballing gets you close, and with enough experience it gets you most of the way there. The tool's edge is that it does the parts human intuition is worst at, precise cost-weighting and slope-driven rollout, every single time, without fatigue or wishful thinking.
What the pros do
Tour players and their caddies are effectively running a coarse version of this in their heads and in their yardage books. They talk in terms of "the miss," they identify the "no-go" side, they know which pins are "sucker pins," and they pick a spot on the green that leaves the easiest next shot. The best ones aren't aiming to make birdie. They're aiming to make their worst outcome acceptable. The 12th is the canonical example, but every pin gets this treatment. The difference between them and a good amateur usually isn't the swing on the approach. It's that they've already decided where the misses are allowed to go.
When should you ignore the optimal aim?
The optimal aim minimizes your average score, and average isn't always what you're playing for. There are real situations to override it:
- You need a birdie, now. Match play, last hole, must-win. If the expected-value play makes par and par loses, you take on the tucked pin, because a safe par is a loss anyway. When you need the tail of the distribution, you aim at the tail.
- You're protecting a lead. The mirror image. Bias even more conservative than optimal. A double here loses the tournament, so give up the birdie look entirely.
- The conditions break the model's assumptions. Howling crosswind toward the water, rock-hard greens the tool can't see. Trust your eyes and widen your margins.
What's almost never right is the "no risk, no reward" swagger applied to a normal shot. Firing at a sucker pin on the 4th hole of a stroke-play round because it feels bold isn't brave. It's just donating strokes. Risk should be a deliberate response to the scoreboard, not a personality trait. The default is the high-percentage play. You deviate from it on purpose, with a reason, not out of ego.
Enjoying this? Browse the rest of the OpenSG blog for more strokes-gained deep dives.
The real payoff: learning the course for when the tool is gone
Here's the part that matters most, because in a real tournament you can't use any of this. No rangefinders with slope, no app doing the math. So what's the point?
The point is that OpenSG is a teacher, and the lesson transfers. Play a practice round and let the tool show you the optimal aim on every hole. Over time you stop being surprised by it. You start predicting where the marker will land before it appears. "Okay, water right, back pin, it's going to want me twenty feet left and pin-high." That prediction, built over dozens of holes, is exactly the intuition tour players have. You're not memorizing answers. You're calibrating your instincts against ground truth until they're good enough to stand alone.
And you can make the transfer concrete. On a practice round before a tournament, use the app to learn each green's real behavior. Which way it sheds, where the safe fat is, which pins are traps. Then write it in your yardage book. Simple notes and markers you're allowed to carry into competition:
- The safe center-of-green aim for each likely pin ("back-right pin, aim front-center, 15 ft short is fine").
- Which side is the cheap miss and which is the card-wrecker ("bunker left OK, NEVER right").
- Where each green feeds ("everything releases toward the front-left bowl").
- Your own club for the stock number, with its real dispersion in mind.
On tournament day you're not doing math and you're not guessing. You're reading notes you built from data, executing decisions you've already made. The tool did the teaching in practice. You do the playing in competition. That's the whole idea. Not to lean on it forever, but to use it to build the judgment that makes you dangerous when it's not there.
Aim at the fat part. Favor the cheap miss. Respect the slope. Decide your misses before you swing. Do that and you'll shave strokes without touching your golf swing at all.